Bạn đọc quan tâm đón xem trên trang 34, 35 của Tạp chí e-CHÍP 277 ra ngày Thứ sáu, 01/04/2011.
Showing posts with label Flash - Những tuyệt chiêu .... Show all posts
Friday, April 1, 2011
Tạo thiệp mừng cá tháng 4!
Mời bạn cùng thực hiện một tấm thiệp "trêu đùa" bạn bè. Hãy nhờ chú bồ nông mang tặng bạn bè một món quà nho nhỏ được thả rơi từ bầu trời, người nhận sẽ phải nhấp chuột vào hộp quà để mở ra... một hộp quà khác, tiếp tục như vậy cho đến hộp quà cuối cùng. Và người nhận sẽ phải rượt đuổi theo hộp quà mà không bắt được. Sau 20 mươi lần rượt đuổi, lúc này người nhận sẽ... bực mình đấy, nhưng họ sẽ mỉm cười thú vị khi biết đây chỉ là trò đùa cá tháng tư!
Bạn đọc quan tâm đón xem trên trang 34, 35 của Tạp chí e-CHÍP 277 ra ngày Thứ sáu, 01/04/2011.
Thursday, December 23, 2010
Tạo thiệp giáng sinh với Adobe Flash Pro CS5
Tạo thiệp điện tử mừng giáng sinh với Adobe Flash Pro CS5
Giáng sinh sắp đến, hẳn bạn cũng muốn có những món quà do chính bạn tạo ra để tặng người thân, bạn bè hay “người ấy”,… Với những tư liệu vector tuyệt đẹp có sẵn, cộng một chút kỹ năng Flash sẽ giúp bạn có những tấm thiệp điện tử thật thú vị cho mùa giáng sinh năm nay.
Mời các bạn quan tâm đón xem trên trang 34 và 35 của Tạp chí e-CHÍP 267 (Thứ sáu, 24/12/2010)
Giáng sinh sắp đến, hẳn bạn cũng muốn có những món quà do chính bạn tạo ra để tặng người thân, bạn bè hay “người ấy”,… Với những tư liệu vector tuyệt đẹp có sẵn, cộng một chút kỹ năng Flash sẽ giúp bạn có những tấm thiệp điện tử thật thú vị cho mùa giáng sinh năm nay.
Mời các bạn quan tâm đón xem trên trang 34 và 35 của Tạp chí e-CHÍP 267 (Thứ sáu, 24/12/2010)
Saturday, August 28, 2010
Sử dụng định dạng FXG trong Flash CS5
FXG (viết tắt từ Flash XML Graphic) là một định dạng mới được giới thiệu trong Flash CS5. Định dạng này cho phép bạn đưa những đối tượng trên Flash CS5 qua các ứng dụng như Illustrator, Photoshop, Fireworks, Catalyst để hiệu chỉnh và sử dụng.
Minh họa này giới thiệu cách thức đưa một đối tượng từ Flash Pro CS5 qua Illustrator để hiệu chỉnh, sau đó đưa trở lại Flash dể diễn hoạt.
- Trong Flash Pro CS5, ta có sẵn hình vẽ cờ đỏ sao vàng > hãy chọn hết hình này

- Vào menu Effect > Warp > Flag…
Mặc dù minh họa này vô cùng đơn giản, nhưng hẳn đã mang đến cho bạn một cái nhìn tổng quát về tác dụng của định dạng mới FXG này.
Mọi góp ý, thắc mắc bạn có thể gửi về thachtruongthao@gmail.com
THẠCH LONG (e-CHIP 250, 27/8/2010)
Thursday, August 26, 2010
Sử dụng định dạng FXG trong Flash CS5
FXG (viết tắt từ Flash XML Graphic) là một định dạng mới được giới thiệu trong Flash CS5. Định dạng này cho phép bạn đưa những đối tượng trên Flash CS5 qua các ứng dụng như Illustrator, Photoshop, Fireworks, Catalyst để hiệu chỉnh và sử dụng.
Minh họa ở trang 37 (e-CHIP 250, 27/8/2010) sẽ giới thiệu cách thức đưa một đối tượng từ Flash Pro CS5 qua Illustrator để hiệu chỉnh, sau đó đưa trở lại Flash để tạo diễn hoạt.
THẠCH LONG (e-CHIP 250, 27/8/2010)
Saturday, August 1, 2009
Hướng dẫn làm karaoke bằng Flash
Video hướng dẫn làm karaoke bằng Flash. Vì thực hiện khá gấp nên có một vài chổ không chính xác (nhưng đó chỉ là những chổ không quan trọng lắm).
Download file Demo karaoke by Flash: http://ugotfile.com/file/326855/hd karaoke Flash.flv
http://graphicttt.blogspot.com/
Friday, May 22, 2009
Adobe Flash Player 10.0 (CS4)
Cập nhật Flash Player mới nhất!
Nếu file swf được thiết kế trên Flash mới, mà bạn vẫn dùng Flash Player cũ thì có một vài hiệu ứng không hiển thị hoặc thậm chí không xem được!
Tải tại:
Tuesday, April 7, 2009
Tạo nút 2 chức năng: Pause Play!
Vừa rồi trên lớp có bạn hỏi về cách tạo nút PausePlay như thường thấy trong các chương trình Multimedia! Đây là vài viết hướng dẫn tạo nút này trong Flash 8!
1. Chức năng:
- Ban đầu, hiển thị nút Pause.
- Khi nhấn nút Pause thì MovieClip sẽ dừng và nút này chuyển thành nút Play.
- Khi nhấn nút Play, MovieClip tiếp tục và nút này chuyển thành nút Pause.
2. Thao tác:
Thao tác cụ thể xem tại: Tạo nút 2 chức năng: Pause và Play!
File demo: http://www.mediafire.com/download.php?ivddduueehz
Saturday, June 23, 2007
Glowing neon playback control buttons - Part 1
In this easy lesson made for Flash 8 professional I will show you how to create a set of cool, neon glow playback control buttons easily. No other applications will be used to create these buttons, because Flash has so much power on its own! You will see:
- How to use the basic shapes to create the ones you need,
- How to use the great blending filters in Flash 8 pro,
- How to combine multiple filters and objects stacked upon one another, and some more.
You can see the example of the sleek buttons below.
Preliminary steps — setting the background
1. Open a new Flash document. Choose Modify > Document (shortcut: Ctrl+J). Select black as document background color. Click OK.
1. Mở Flash, tạo Document mới. Vào Modify > Document (shortcut: Ctrl+J) chọn BackGround màu đen
2. Select the Rectangle tool (R). Turn off the stroke color by clicking on the little pencil icon and then the small red-striped square at the bottom of the Tools panel:
.4. Click the Set Corner Radius icon (
) and enter 6 in the window that will show up, click OK. This is done in order to have rectangles with round corners.5. Draw a flat color (any color will do) 410 by 120 pixel rectangle.
5. Vẽ một hình chữ nhật với màu bất kỳ có kích thước 410 x 120 pixel
6. Select the Paint Bucket tool (K). Go to the Color Mixer panel (opened by default — you can always find it in the top right part of the Flash working space). Do the following (see numbers in the screenshot below):
+1. Click on the paint bucket icon to select the fill color.
+2. In the Type menu, select Linear.
+3. Click once on the small colored square found on the bottom right.
+4. In the color code field, enter the hex code #2E70AA (that's a zero, not the letter O).
+5. Set the Alpha property for this color to 34%.
+6. Set the same color for the left square, but set its Alpha to 100%.
+1. Click on the paint bucket icon to select the fill color.
+2. In the Type menu, select Linear.
+3. Click once on the small colored square found on the bottom right.
+4. In the color code field, enter the hex code #2E70AA (that's a zero, not the letter O).
+5. Set the Alpha property for this color to 34%.
+6. Set the same color for the left square, but set its Alpha to 100%.
6. Chọn Paint Bucket tool (K). Vảo bảng Color Mixer và làm như sau:
+1. Chọn icon Paint Bucket
+2. Trong menu Type, chọn Linear
+3. Chọn vạch màu bên phải
+4. Trong khung mã màu điền: #2E70AA
+5. Trong khung Alpha: 34%
+6. Vạch màu bên trái làm tương tự nhưng với Alpha: 100%
7. Press and hold Shift, click near the rectangle's top and drag your mouse down until the rectangle's bottom. Release your mouse button, and there is your nice gradient!
7. Nhấn và giữ Shift và kéo từ mép trên xuống mép dưới của hình chữ nhật
Creating the glowing outer ring
8. Lock the current layer and call it background. Create a new layer and call it buttons.
8. Khóa Layer hiện tại và tạo một layer mới
9. Select the Oval tool (O). Go to the Property inspector and make the following selections: block the fill color, select any flat color for the stroke (outline) color, set the line type to Solid and choose 3 for line thickness.
9. Chọn Oval tool (O), vẽ một vòng tròn với màu bất kỳ, có độ dày là 3 trong bảng Properties
10. Somewhere over the rectangle, draw a ring (it is a circle, but because of the line thickness and lack of fill, it looks like a ring). Make it 70 by 70 pixels.
10. Set lại vòng tròn với kích thước 70 x 70 pixel.
11. Select the ring by clicking on it with the Selection tool (V), if it isn't already selected. Go to the Color Mixel panel and click on the pencil icon to select the Stroke color (
). In the Type menu, choose Linear exactly like you did for the fill color previously. Add two more color squares to the gradient by simply clicking anywhere between the two existing ones. You should have four of them in total, with the following color values, positioned like this:11. Chọn Selection tool (V) click vào vòng tròn. Vào bảng Color Mixel, chọn tiếp Stroke color (
). Trong Type chọn Linear rồi thêm vào 2 vạch màu nữa và set màu cho các vạch đó như hình dưới:
). Trong Type chọn Linear rồi thêm vào 2 vạch màu nữa và set màu cho các vạch đó như hình dưới:Note: all the four squares should have their alpha set to 100% (complete opaqueness). The ring will now look like this:
Chú ý: 4 vạch màu đều có Alpha: 100%
I have hidden the background layer to work more easily and so that you can more clearly see the various steps.
12. Select the Gradient Transform tool (F). Click on the ring to select it. Rotate the gradient by 90°. To successfully do this, make sure that Snapping to Objects is turned on (View > Snapping > Snap to Objects). Then, press and hold Shift, click on the white circle handle and start moving your mouse clockwise.
12. Mở Snapping to Objects (View > Snapping > Snap to Objects). Dùng Gradient Transform tool (F), xoay vòng tròn 90*. Để dễ xoay thì nhấn và giữ phím Shift khi đang xoay.
13. While the ring is selected, press F8 (or select Modify > Convert to Symbol) to make a symbol out of it. Name it outer ring. Select Movie clip as type and be sure to select the registration point in the middle (see screenshot below):
13. Chọn vòng tròn, nhấn F8 (Modify > Convert to Symbol) để chuyển nó thành symbol. Chọn Movie clip, điểm Registration nằm chính giữa với tên "outer ring".
Click OK. This choice for the registration point will make it easier to align the elements inside the button later.
14. Click on the Filters tab in the Properties panel (see no. 1 in screenshot below). Click on the plus icon (2) and select the Glow filter. Make the adjustements as follows:
3: Blur X and Y: 8
4: Strength: 260%
5: Quality: High.
6: Color: #ADE2FC.
14. Mở bảng Properties, chọn thẻ Filters và điền vào những thông số như sau:
3. Blur X and Y: 8
4. Strength: 260%
5. Quality: High.
6. Color: #ADE2FC.
Leave the Knockout and Inner glow options unchecked. You will get a nice glow for your outer ring:
Chú ý: không đánh dấu vào Knockout và Inner glow
Making the main button circle
15. Select the ring again and press F8 again, while leaving the same registration point as previously and Movie clip as type of symbol. Call the new symbol play button and click OK.
15. Chọn vòng tròn một lần nữa. Nhấn F8 để tạo một Movie clip symbol mới tên là "play button".
16. Double-click on the newly made play button symbol to enter inside it. Call the first layer outer ring and lock it. That's where the ring that you have just created resides. Make a new layer above it and call it circle.
16. Double-click vào Movie clip vừa tạo. Lock layer hiện tại đồng thời tạo thêm một layer mới.
17. Select the Oval tool (O) again. Go down to the Properties panel. Set #B0E2FD for the outline color and #3A5274 for the fill color. Select Solid as line type and a thickness of 2.
17. Chọn Oval tool (O). Trong bảng Properties set #B0E2FD trong phần màu của outline, #3A5274 trong phần màu của fill, 2 trong phần độ dày outline.
18. Draw a 54 by 54 pixel circle on the stage, anywhere.
18. Vẽ một vòng tròn 54 x 54 pixel
19. Select the circle (both the outline and the fill). Open the Align panel by selecting Window > Align. Turn on the To stage button (1). Click the align horizontal center (2) and align vertical center (3) buttons.
19. Chọn vào vòng tròn (nhớ là cả outline lẫn fill). Mở bảng Align(Window > Align). Bật To Stage (1), click vào align horizontal center (2) và align vertical center (3).
The circle will now be perfectly aligned with the play button movie clip's registration point and also with the ring below it.
20. Choose the Selection tool (V) and click on the fill of the circle once to select it. Press Ctrl+C to copy it.
20. Chọn Selection tool (V) và chọn vào phần fill của vòng tròn nhấn Ctrl+C.
21. Lock the current layer and call it circle. Make a new layer above it and call it circle overlay.
21. Khóa layer hiện tại và tạo một layer mới.
22. Select Edit > Paste in Place to paste the circle you copied two steps earlier exactly on the same position, but inside this new layer.
22. Vào Edit > Paste in Place
23. The copy of the circle fill will be selected by default after pasting. Go to the Color Mixer panel. Click on the paint bucket icon to select the fill color. In the Type menu, select Linear. Make the following gradient:
- You should have three color squares, one in the middle and one on each end of the gradient.
- Each square's color should be white.
- The alpha factor of squares on each end should be 41%. The middle one's should be set to 3%.
23. Vào bảng Color Mixer, chọn icon Paint Bucket, kiểu Linear trong Type để tạo một Gradient như sau:
+ Có 3 vạch màu
+ Tất cả đều mang màu trắng
+ Alpha tuần tự là 41% 3% 41%
24. Use the Gradient Transform tool (F) to rotate the gradient by 90°, just like before. The final result should look like this:
24. Dùng Gradient Transform tool (F) quay vòng tròn vừa tạo 90*. Ta có kết quả như sau:
To make the final elements of the play button, continue onto the next page.
Glowing neon playback control buttons - Part 2
Creating the play icon
25. Lock the circle overlay layer, make a new layer above it and call it icon.
25. Lock layer hiện tại và tạo layer mới.
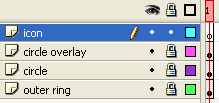
26. Select the Rectangle tool (R). Block the stroke color. Set the fill color to #3A5274. Draw a 33 by 33 pixelsquare anywhere on the stage.
26. Chọn Rectangle tool (R). Tắt Stroke color. Chỉnh Fill color thành #3A5274. Vẽ một hình vuông 33 x 33 pixel.
27. Turn on the Snap to Objects option and use the Selection tool (V) to create a triangle out of the rectangle. Do it like this (follow the image sequence below):
- Bring the cursor close to the square's upper right corner.
- Click and start dragging down, until you reach the middle of square's height. Release your mouse button.
- Repeat the same thing for the lower right corner of the square, this time dragging the corner towards the point you just made in the previous move. Once near, the corner will snap into place. Release the mouse and there is your triangle.
28. Click on the triangle to select it. Go to the Property inspector and type 27 in the W (width) field. There! You have a good-looking play button now. The screenshots below show the difference in size before and after the width of the triangle was modified.
28. Chọn hình tam giác và set lại width 27 height 33

29. Center the triangle inside the button.
29. Dùng bảng Align đưa hình tam giác vào chính giữa
30. Select the Ink bottle tool (S). In the Properties panel, choose Solid as type and set the thickness to 4. Click anywhere on the triangle to give it an outline.
30. Ink bottle tool (S), chọn kiểu Solid với độ dày 4 và click vào bất cứ chỗ nào trên tam giác

31. Choose the Selection tool (V). Double-click on the triangle's border to select it.
31. Chọn Selection tool (V), Double-click vào đường viền của hình tam giác để chọn phần outline.
32. Press Ctrl+X to cut the outline.
32. Nhấn Ctrl+X để cắt phần outline
33. Lock the icon layer. Make a new layer below it and call it icon outline.
33. Lock layer hiện tại, và tạo một layer phía dưới.
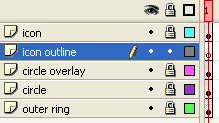
34. Select Edit > Paste in Place to place the icon border here, right below the icon itself.
34. Vào Edit > Paste in Place
35. Lock the icon outline layer and unlock the icon layer. Select the triangle inside it.
35. Lock layer hiện tại và mở layer trên đồng thời chọn tam giác vừa tạo.
36. Hit F8 to convert it into a symbol. Call it play icon and click OK.
36. Nhấn F8 để chuyền thành Movie clip với tên "play icon".
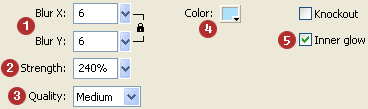
37. The new play icon movie clip will be selected by default. Go to the Properties panel and click on the Filters tab to set the blending options for this symbol. Choose the Glow filter and tweak it like this:
- Blur X and Y: 6
- Strength: 240%
- Quality: Medium
- Color: #ACE0FD
- Inner glow must be turned on.
37. Vào bảng Properties, thẻ Filters điền vào các thông số sau:
1. Blur X and Y: 6
2. Strength: 240%
3. Quality: Medium
4. Color: #ACE0FD
5. Bật Inner glow.
And — ta-daa — here's the final result, with the background:

Now ain't it cool? This blue neon glow looks soooo good :-)! Let me show you now how to easily duplicate theis button and create a stop button out of it.
Creating the glowing stop button from the play button
38. Go back to the main scene by clicking on the Scene 1 link.
38. Quay trở lại Scene 1.

39. Open the Library by selecting Window > Library.
39. Mở Library (Window > Library).
40. Right-click on the play button in the Library and select Duplicate from the pop-up menu. The Duplicate Symbol window ill appear. Just change the symbol's name to stop button and click OK.
Repeat the same thing with the play icon symbol: duplicate it and call the new symbol stop icon. You will have fice symbols (all of them movie clips) in the Library now: the outer ring which is present in both the play button and stop button symbols, as well as play icon and stop icon for each respective symbol. Let me show you now how to make the modifications.
40. Right-click vào "play button" trong Library và chọn Duplicate rồi đổi tên symbol vừa tạo thành "stop button".
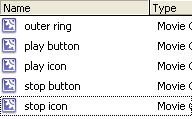
41. Double-click on the stop button symbol inside the Library to enter inside it. Unlock its icon layer.
41. Double-click vào "stop button". Unlock layer "icon" .
42. Click once on the play icon that is inside it, to select it.
42. Click một lần vào "play icon" để chọn.
43. Go to the Properties panel and click the Swap button.
43. Vào bảng Properties chọn "Swap..."
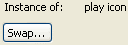
44. The Swap Symbol window will show up. All the symbols that you made in your Flash document so far are displayed here — exactly as they appear in the Library. Select the stop icon symbol and click OK.
44. Chọn vào symbol "stop icon".
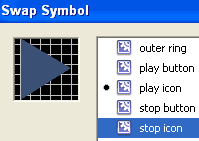
Although this movie clip symbol looks exactly the same as the play icon, you know that this is the stop icon in fact. Flash informs you of this by displaying the name of the currently selected symbol in the Properties panel:

45. Now, double-click the stop icon movie clip on the stage to enter inside it. Erase the triangle and draw a 28 by 28 pixel borderless square in its place. I have made the square smaller, because if it had the dimensions of the triangle, it would come too close to the circle's border and that wouldn't look so good. Oh, yes: the color of the square should be the same as triangle's: #3A5274.
45. Double-click "stop icon" movie clip. Xóa hình tam giác và vẽ một hình vuông không có outline với kích thước 28 x 28 pixel; màu #3A5274.
46. Click on the stop button link to go back to the movie clip's timeline.
46. Click vào link "stop button" phía trên timeline

47. Align the icon in relation to the movie clip's center.
47. Sử dụng bảng Align để đưa nó vào chính giữa
48. Lock the icon layer. Unlock the icon outline layer. Erase the outline triangle that is inside it.
48. Lock layer hiện tại, mở "icon outline layer". Xóa đi cái outline của hình tam giác.
49. Draw a rectangle here, without a fill, and make it the same size as the icon above it: 28 by 28 pixels. the line should have the same thickness as before (4) and the same color (#3A5274). Align it like you did with the icon. It should look like this:
49. Vẽ một hình chữ nhật bằng Line tool (L). Kích thước 28 x 28 pixel. Màu (#3A5274). Độ dày 4. Canh chính giữa
And finally, here are both the play and stop neon glow buttons, side by side:

They look awesome! And there was no need at all to use Photoshop! The pause, fast forward and rewind buttons can be made easily now — you know now the easy principle of duplicating symbols. Just make smaller triangles for the rewind button and make two rectangles for the pause button. Nothing easier than that.
A single button that you just made has a file size of only 439 bytes! The same button made in Photoshop would have a file size ten times bigger than the one made in Flash!
Hope you liked this tutorial. Take a look at other Flash tutorials on menus, buttons and interfaces that I made — you will find a lot to learn. Besides the design, these tutorials also explain how to make complete website navigation systems, so don't miss them!
Download file mẫu
or
Download the source file for this lesson
Subscribe to:
Posts (Atom)


