Creating the play icon
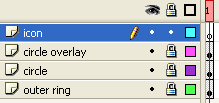
25. Lock the circle overlay layer, make a new layer above it and call it icon.
25. Lock layer hiện tại và tạo layer mới.
26. Select the Rectangle tool (R). Block the stroke color. Set the fill color to #3A5274. Draw a 33 by 33 pixelsquare anywhere on the stage.
26. Chọn Rectangle tool (R). Tắt Stroke color. Chỉnh Fill color thành #3A5274. Vẽ một hình vuông 33 x 33 pixel.
27. Turn on the Snap to Objects option and use the Selection tool (V) to create a triangle out of the rectangle. Do it like this (follow the image sequence below):
- Bring the cursor close to the square's upper right corner.
- Click and start dragging down, until you reach the middle of square's height. Release your mouse button.
- Repeat the same thing for the lower right corner of the square, this time dragging the corner towards the point you just made in the previous move. Once near, the corner will snap into place. Release the mouse and there is your triangle.
28. Click on the triangle to select it. Go to the Property inspector and type 27 in the W (width) field. There! You have a good-looking play button now. The screenshots below show the difference in size before and after the width of the triangle was modified.
28. Chọn hình tam giác và set lại width 27 height 33
29. Center the triangle inside the button.
29. Dùng bảng Align đưa hình tam giác vào chính giữa
30. Select the Ink bottle tool (S). In the Properties panel, choose Solid as type and set the thickness to 4. Click anywhere on the triangle to give it an outline.
30. Ink bottle tool (S), chọn kiểu Solid với độ dày 4 và click vào bất cứ chỗ nào trên tam giác
31. Choose the Selection tool (V). Double-click on the triangle's border to select it.
31. Chọn Selection tool (V), Double-click vào đường viền của hình tam giác để chọn phần outline.
32. Press Ctrl+X to cut the outline.
32. Nhấn Ctrl+X để cắt phần outline
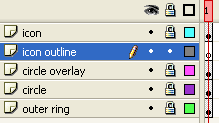
33. Lock the icon layer. Make a new layer below it and call it icon outline.
33. Lock layer hiện tại, và tạo một layer phía dưới.
34. Select Edit > Paste in Place to place the icon border here, right below the icon itself.
34. Vào Edit > Paste in Place
35. Lock the icon outline layer and unlock the icon layer. Select the triangle inside it.
35. Lock layer hiện tại và mở layer trên đồng thời chọn tam giác vừa tạo.
36. Hit F8 to convert it into a symbol. Call it play icon and click OK.
36. Nhấn F8 để chuyền thành Movie clip với tên "play icon".
37. The new play icon movie clip will be selected by default. Go to the Properties panel and click on the Filters tab to set the blending options for this symbol. Choose the Glow filter and tweak it like this:
- Blur X and Y: 6
- Strength: 240%
- Quality: Medium
- Color: #ACE0FD
- Inner glow must be turned on.
37. Vào bảng Properties, thẻ Filters điền vào các thông số sau:
1. Blur X and Y: 6
2. Strength: 240%
3. Quality: Medium
4. Color: #ACE0FD
5. Bật Inner glow.
And — ta-daa — here's the final result, with the background:
Now ain't it cool? This blue neon glow looks soooo good :-)! Let me show you now how to easily duplicate theis button and create a stop button out of it.
Creating the glowing stop button from the play button
38. Go back to the main scene by clicking on the Scene 1 link.
38. Quay trở lại Scene 1.
39. Open the Library by selecting Window > Library.
39. Mở Library (Window > Library).
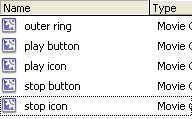
40. Right-click on the play button in the Library and select Duplicate from the pop-up menu. The Duplicate Symbol window ill appear. Just change the symbol's name to stop button and click OK.
Repeat the same thing with the play icon symbol: duplicate it and call the new symbol stop icon. You will have fice symbols (all of them movie clips) in the Library now: the outer ring which is present in both the play button and stop button symbols, as well as play icon and stop icon for each respective symbol. Let me show you now how to make the modifications.
40. Right-click vào "play button" trong Library và chọn Duplicate rồi đổi tên symbol vừa tạo thành "stop button".
41. Double-click on the stop button symbol inside the Library to enter inside it. Unlock its icon layer.
41. Double-click vào "stop button". Unlock layer "icon" .
42. Click once on the play icon that is inside it, to select it.
42. Click một lần vào "play icon" để chọn.
43. Go to the Properties panel and click the Swap button.
43. Vào bảng Properties chọn "Swap..."
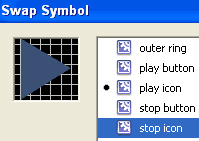
44. The Swap Symbol window will show up. All the symbols that you made in your Flash document so far are displayed here — exactly as they appear in the Library. Select the stop icon symbol and click OK.
44. Chọn vào symbol "stop icon".
Although this movie clip symbol looks exactly the same as the play icon, you know that this is the stop icon in fact. Flash informs you of this by displaying the name of the currently selected symbol in the Properties panel:
45. Now, double-click the stop icon movie clip on the stage to enter inside it. Erase the triangle and draw a 28 by 28 pixel borderless square in its place. I have made the square smaller, because if it had the dimensions of the triangle, it would come too close to the circle's border and that wouldn't look so good. Oh, yes: the color of the square should be the same as triangle's: #3A5274.
45. Double-click "stop icon" movie clip. Xóa hình tam giác và vẽ một hình vuông không có outline với kích thước 28 x 28 pixel; màu #3A5274.
46. Click on the stop button link to go back to the movie clip's timeline.
46. Click vào link "stop button" phía trên timeline
47. Align the icon in relation to the movie clip's center.
47. Sử dụng bảng Align để đưa nó vào chính giữa
48. Lock the icon layer. Unlock the icon outline layer. Erase the outline triangle that is inside it.
48. Lock layer hiện tại, mở "icon outline layer". Xóa đi cái outline của hình tam giác.
49. Draw a rectangle here, without a fill, and make it the same size as the icon above it: 28 by 28 pixels. the line should have the same thickness as before (4) and the same color (#3A5274). Align it like you did with the icon. It should look like this:
49. Vẽ một hình chữ nhật bằng Line tool (L). Kích thước 28 x 28 pixel. Màu (#3A5274). Độ dày 4. Canh chính giữa
And finally, here are both the play and stop neon glow buttons, side by side:
They look awesome! And there was no need at all to use Photoshop! The pause, fast forward and rewind buttons can be made easily now — you know now the easy principle of duplicating symbols. Just make smaller triangles for the rewind button and make two rectangles for the pause button. Nothing easier than that.
A single button that you just made has a file size of only 439 bytes! The same button made in Photoshop would have a file size ten times bigger than the one made in Flash!
Hope you liked this tutorial. Take a look at other Flash tutorials on menus, buttons and interfaces that I made — you will find a lot to learn. Besides the design, these tutorials also explain how to make complete website navigation systems, so don't miss them!
Download file mẫu
or
Download the source file for this lesson









No comments:
Post a Comment