By Steve Bain
In part 1 of this 2-part article, we learned how to create the illusion of chiseled effects in CorelDRAW 11 using the most basic of shapes. Next, we'll explore how to deal with more complex shapes and apply realistic color schemes to simulate lighting. If you haven't yet absorbed part one, now may be a good time since the settings you'll need to have selected and the techniques covered in those step sequences lay the groundwork for the tutorials which follow.
Tackling different object types
It goes without saying that the shapes you'll want to apply the chisel effect to won't always be simple circles, squares or polygons. In fact, you can apply this effect to almost any object type you can create in CorelDRAW 11. But, how you approach each challenge will depend on the object type. Let's take a close look at three uniquely different examples and explore how chiseled sides can be created.
Freehand lines
First, we'll see how our chisel effect can be applied to a simple open curved path. The basic thrust of this technique involves drawing an open path, applying a heavy line weight, converting the outline to an object, and applying the chisel to the resulting shape.
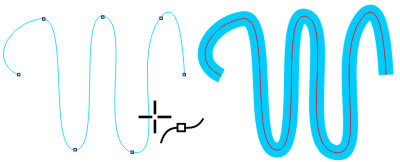
If you don't already have a line ready to apply the effect to, use the Bezier Tool to create an open path. Be sure the path doesn't cross itself, and try to ensure it is composed of mostly curves with a minimum of nodes. Copy your selected path to the clipboard (Ctrl+C) for a later step.
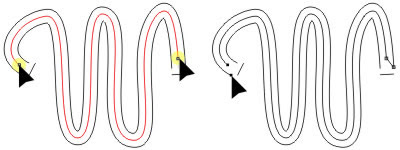
With the path selected, choose the Pick Tool and use Property Bar options to increase its thickness value (in this case 16 points). Then, choose Arrange, Convert Outline to Object (Ctrl+Shift+Q) to convert the state of your line into a closed path complete with corner nodes (as shown next).- Choose the Shape Tool (F10) and select each pair of nodes at either end of the object and use the Break Curve button in the Property Bar separate the nodes. Then, choose Arrange, Break Curve Apart (Ctrl+K) to separate each of the lines in the object. Select each of the lines representing the ends and use your Nudge keys to offset their position (as shown next).

Paste (Ctrl+V) a copy of the original path from your clipboard onto your page. By default, the copy is pasted exactly in its original position, but you'll need to perform a little node editing. Using the Shape Tool, double click to add a new point beside each end point, and double-click the existing end points to delete them. Choose the Pick Tool and press your numeric keypad "+" key to duplicate the path.
Select the copy together with one of the paths representing the outline of your shape and Combine them (Ctrl+L). Using the Shape Tool, select each pair of end nodes and click the Extend Curve to Close button in the Property Bar to close each end of the object (shown next). Now select the path you duplicated together with the second outline and repeat this. You now have two sides of your chisel effect and only the ends remain unfinished.
Using the Pick Tool, select one of the end lines you moved earlier and use your Nudge keys to move it back into position. Now, choose the Bezier Tool, click one of the end points, and click the point where the two chisel paths meet. Then, click the last node on the line to close the path. Perform this same operation on the line at the opposite end of your chiseled line.
Since the two shapes in your chisel are curved, let's apply a radial fountain fill applied to each to create the shading effect. Using the Interactive Fill Tool, select the upper chiseled side of the shape and choose Radial as the Fill Type from the Property Bar to apply the fill at defaults. Drag the white center marker to the upper-left area of the shape and drag any dark color from your onscreen color palette to the other secondary fill marker. Then, select the lower chisel side and do the same, but this time drag the white center marker to the lower-right area. To finish the shading, set the end shapes with the same uniform color used for your secondary color and your effect is complete (as shown next).
Chiseling simple text shapes
Creating chiseled text effects is of the more practical applications. Simple text characters are relatively easy to work with, but you'll need to analyze each character shape before you begin. In the case of characters, the one-step Blend usually serves as the best technique to use. Let's examine how to apply this effect to a simple sans-serif character shape.
Using the Text Tool (F8), create an Artistic Text character (single click, then type the character), and apply your size, font, and weight attributes using Property Bar options. The example is an uppercase C set to Franklin Gothic Heavy Italic. Choose the Pick Tool and convert your character to curves (Ctrl+Q).
Using the Shape Tool (F10), select the nodes joining the curves with the straight lines and click the Break Curves button in the Property Bar to unjoin the nodes. Then, use the Break Apart command to separate the curved lines from the straight lines (as shown next).
Choose the Interactive Blend Tool and click-drag between the two curve paths to create a default blend effect. Use Property Bar options to set the number of blend steps to 1. You'll notice the blend effect doesn't even come close to matching the shape of either curve. This is because the nodes have not yet been mapped.
Click the Miscellaneous Blend Options button in the Property Bar and choose Map Nodes. Use the targeting cursor to click on each of the adjacent end nodes on the two curves to map them to each other (as shown next). Using the Pick Tool, right-click the blend object and choose Break Blend Group Apart from the popup menu to separate the effect. Even after the node mapping is complete, you may notice the blend object is still slightly inaccurate (as highlighted in yellow). You can often correct these irregularities using the Shape Tool by double-clicking to delete the node(s) where the anomaly occurs.
- With your chisel path selected, use the Shape Tool to add nodes as shown next, and delete the existing endpoints to shorten the curve shape. Select the curve using the Pick Tool and press "+" on your numeric keypad to create a copy. Combine (Ctrl+L) the copy with the outer curve, use the Shape Tool to select two adjacent endpoints, and click the Extend to Close Curve button in the Property Bar. Repeat this to join the two nodes at the opposite end and close the path.

Choose the Bezier Tool next and click one of the short, straight lines remaining. Click an existing node and click the point where the two chisel corners meet and then click the opposite end of the line to close the path. Repeat this operation on the other straight end line.
To apply quick shading to the curved shapes of the arrangement, use the Interactive Fill Tool to apply radial fills using white as the center color and any dark color as the ending color. Position the white center at the upper-left on the inner curve and at the lower-right for the inner curve (shown next). Apply Uniform fills to the triangular chisel shapes at either end and you're done.
Chiseling more complex character shapes
Complex characters require a little more ingenuity as you'll discover next. The approach is similar, but more steps are involved. Let's see how it's done.
Begin with an Artistic Text character again, this time an uppercase H. Apply a sans serif font style, such as the Franklin Gothic Heavy Italic used in the example.
Using the Shape Tool, hold Ctrl+Shift while clicking any node to select all nodes. Click the Break Curve button to break the nodes apart and separate all the lines using the Break Apart command (Ctrl+K). Apply an outline color to the lines by right-clicking any color in your onscreen color palette.
Create a one-step blend between the vertical parallel lines in the original character shape using the Interactive Blend Tool (as shown next), right click each blend object and choose Break Blend Group Apart to separate the effect.
Apply a one-step blend between the two horizontal lines and notice the blend path is not the shape you need. Using Property Bar options, click the Miscellaneous Blend Options button and choose Map Nodes. Use the targeting cursor to map the adjacent end pairs to each other. Right-click the blend object and choose Break Blend Group Apart.
The blend paths will serve as the chisel paths, but they'll need to be edited. Using the Shape Tool, increase the length of each line as shown next. Select the three chisel paths and create copies (with the + key). Add nodes on the vertical lines where they meet the horizontal chisel lines and click the Break Curve button. Separate these using the Break Apart command. Each side will now have a corresponding chisel path.
- Assemble the sides using the Combine (Ctrl+L) command and connect the pairs of end nodes for each side using the Shape Tool and the Extend to Close Curve button to close the shapes (as shown next). Then, use the Bezier Tool to finished chiseling the remaining ends. Once the shapes are closed, you're ready to apply the final color and shading and remove the outline colors.

Shading your chisel effect
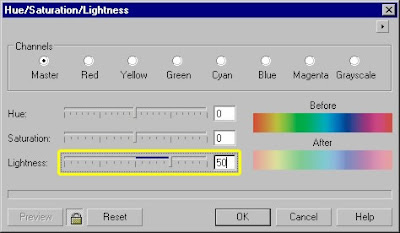
Although nearly every example we've looked at shows a finished a color version, we still need to explore some basic techniques for applying color and shading. After your shapes have been created, this effect would be nothing without it. Before you begin applying color though, you'll need to determine a few key characteristics. For example, is your chiseling recessed or on a raised surface. From which direction will it be lit? How bright is the light source? What is will the color scheme be? Your answers will help you determine which colors to use and where to place them.When it comes to applying uniform fills, the color of chisel sides facing the light will appear brighter while the others are darker. One quick technique to lighten selected object colors applied to the sides facing the light is using the Hue/Saturation/Lightness filter (Ctrl+Shift+U) by moving the Lightness slider (shown next) to the right while clicking the Preview button to view the results.
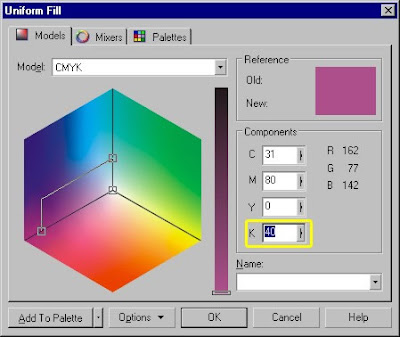
An efficient way to darken selected object colors is by adding black in incremental percentages using the CMYK model. Select the sides you wish to darken and open the Uniform Fill dialog shown next (Shift+F11), click the Models tab and choose CMYK from the Mode menu. Increase Black in percentages of 20 percent until the shade appears suitable.
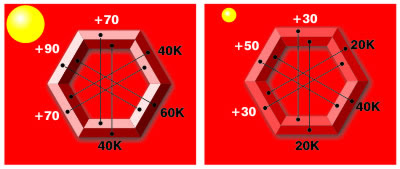
The two examples shown next illustrate a how shading schemes can be applied using the Lightness and techniques discussed next. In this case a base color of Red (100 magenta + 100 yellow) was applied to the shapes. Sides facing the light were lightened using only the Red channel by the values indicated using the Hue/Saturation/Lightness filter. Sides facing away from the light were darkened by adding percentages of black. By varying the settings, you may control lighting contrast illustrated by the bright light source on the left and the dim one on the right. This particular chisel requires only 4 variations on the original color to simulate the lighting.
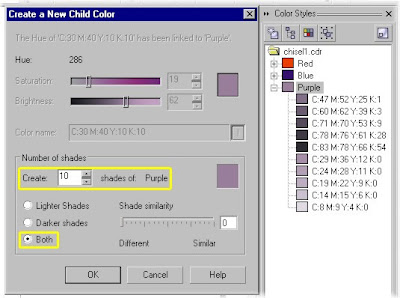
Color Styles offer another quick way to formulate colors. Open the Color Styles docker shown next (Window, Dockers, Color Styles), create a new color, and then create child colors of the color. This will enable you to create a variety of lighter or darker colors (or both) based on whichever color you choose. Use options in the Create a New Child Color dialog to add as many colors as you need.
Raised chisel effects like the ones shown in the examples can quickly be converted to recessed chisel shapes simply by rotating the objects 180 degrees. The example shown next demonstrates how simple rotation creates this illusion. This works perfectly if the objects you're working with are symmetrical. For non-symmetrical objects you may still use the rotated object shades as reference for other objects.

Steve Bain is an award-winning illustrator and designer, and author of nearly a dozen books including CorelDRAW The Official Guide.
Source: http://www.corel.com/

No comments:
Post a Comment