How to draw mechanical threads
By Steve Bain
When it comes to drawing realistic-looking threads for either illustration or engineering drawings, many users often puzzle of just how to tackle the shape and shading aspects. Here's one basic technique you can try on your own using the tools available in CorelDRAW 11 to create machine-bolt style threads around a cylindrical object.
For the thread spiral, you'll be welding three basic objects together (two triangles and a rectangle). Draw a square by click-dragging with the Rectangle Tool (F6) while holding the Ctrl key to constrain its shape. Immediately convert the object to curves by choosing Arrange, Convert to Curves (Ctrl+Q).
Choose the Pick Tool (Spacebar) and double-click any of the four corner nodes in the shape. This will turn the square into a triangle to represent one end of the thread shape. This triangle will represent one end of the spiral thread.
Using the Rectangle Tool again create a rectangle to represent the middle of the thread. Make its thickness roughly two thirds that of your triangle (or scale it later to suit). Using the Pick Tool, position your triangle at one end. Rotate the triangle to point away from the rectangle center with the triangle's longest side touching the end of the rectangle.
Next, create a copy of the triangle for the other end of the rectangle. For a quick copy, use the Pick Tool and drag while clicking the right mouse button. Position the new copy at the other end of the rectangle. With the copy still selected, use the Property Bar Mirror buttons to flip the orientation of the triangle to point away from the rectangle center. With the objects exactly positioned, select all three at once and click the Quick Weld button in the Property Bar. This will cause all shapes to be combined into a single closed object (shown next).
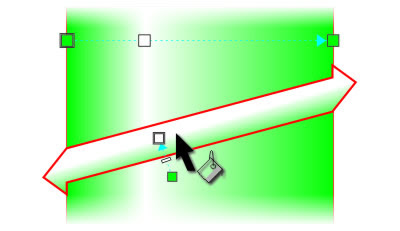
- To angle your new thread object, you'll need to use a Skew transformation. To do this quickly using the Pick Tool, click to display the rotation/skew handles and hold Ctrl while dragging a skew handle to constrain movement to 15-degree increments. Release the mouse button once the object has been skewed 15 degrees.

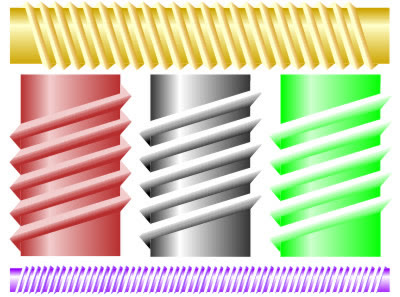
- Create a new rectangle object to represent the screw cylinder to occupy the space between the two triangle ends of the thread. You'll need to layer it in back of the thread spiral by pressing Shift+PageDown. Then, make copies to create additional thread spirals by holding Ctrl as you drag while clicking the right mouse button. Then, use the Repeat command (Ctrl+R) for as many threads as you need. This will create the basic thread arrangement (as shown next).

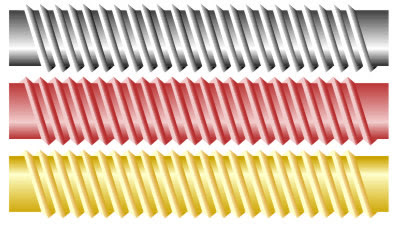
Once your thread arrangement is complete, add color and shading to simulate depth and remove any applied outline colors. Using the Interactive Fill Tool (G) to create custom linear fountain fills. The next illustration shows a simple linear fountain fill using Green-White-Green applied to the cylinder object, and a similar color scheme applied to the threads. The cylinder's white highlight is offset slightly to simulate lighting direction. You will need to set the angle of the linear fountain fill applied to the threads to match the angle of created between the endpoints of the thread spiral.
By varying the cylinder size or the size, angle and/or frequency of the threads, you can quickly create any number of variations. Typical metallic color schemes can also be used to simulate different materials for your thread. Metals such as gold, copper, or steel can be characterized using the contrasting color values applied to their highlight and shadow colors. For gold, set the highlight color to 20 % yellow and the shadow color to 20 % magenta+20 % black+100 % yellow. For copper, set the highlight color to 5 % cyan+20 % magenta+20 percent yellow and the shadow color to 20 % cyan+80 % magenta+80 % yellow+10 % black.
Steve Bain is an award-winning illustrator and designer, and author of nearly a dozen books including CorelDRAW The Official Guide.

No comments:
Post a Comment